Sunday 13 November 2011

I have Moved!

I am happy to announce that I have moved to a new "Blog Home"!

To continue reading about my Gardening Adventures click here.

See you on the other side!!!

Tuesday 29 March 2011

Mulch

Mulch which is an important part of organic gardening.  So, I 'harvest' mine from the ones collected by the local council near my home.


I use it for both my compost bin and also as a mulch.


Bags and bags of it everywhere


They collect and gather it here, where I usually help myself ... like a buffet :-)
Posted by Picasa

Saturday 26 March 2011

Egg Sandwich


Since I started my Organic Gardening, I have not been too successful with the green leafy vegetables.  So far, the best is my French Beans but that's dying too :-(


The four angled beans and Emperor's Vege or "Chan Choy" or Malabar Spinach (red variety) is the only healthy edible greens I have.  So, I regularly harvest the leaves for an organic meal.


Sweet basil, young leaves of Four Angled Beans and Emperor's Vege with an egg


Egg with bread and chili sauce.... Awesome!

Nothing beats the feeling of eating food from my garden!

Posted by Picasa

Wednesday 23 March 2011

Soil Mix

When I was researching on organic gardening, I stumbled on Square Foot Gardening (SFG).  Its a huge thing in the US but unfortunately, I have just read about it.  I have never heard about it before this. 


I must admit that this is a brilliant idea and EVERYONE can do gardening because it does not need much space.  If you are keen to know more, google it.  There are many discussion and information on it.


One of the revolutionary thing about SFG is the soil mix (Mel's Mix) which almost guarantees the success of crops.  Unfortunately many of the stuffs are either very expensive or inaccessible to me locally.  Its peat moss, vermiculite and varieties of compost all mixed together.  1/3 each.


Instead of Mel's Mix, I use my own mix - using my novice gardening logic.  Weird right?  Peat Moss was replaced with Coco Peat (coconut husk) which I purchased from Sg Buloh for RM5 per sack (guni (?) size), vermiculite was replace with rough sand from hardware shop at RM4.50 per bag, burnt soil at RM1 per bag and lastly 2 types of compost.  The first type of compost, I purchased from Ace Hardware and the other from a friend's husband who produces vermicompost at his factory (That one looks like black gold!).  I probably need to get more of that.  It cost RM9 per bag.  Not sure what's the weight... Maybe 1-2 kg.  If you stay in Selangor and wants that product, send me an email and I will forward her contact to you.


Coco peat is to retain water in the soil


I bought 4 sack of this


Burnt soil

Sunday 20 March 2011

Compost Bin

Every organic gardener compost their waste. Its almost synonymous when you mention organic gardening.


Well, in that case, I should not be left out!


I researched in YouTube extensively about the subject and decided on an easy and workable system. Chicken wire.


So, a 3 feet diameter chicken wire was purchased.


One thing which is totally wonderful about my residential area, is that the local council takes very good care of the surroundings. Dried leaves are swept regularly and neatly loaded into plastics. I harvest these dried leaves whenever I need them as brown layer for my compost or mulch.


When there are heaps, I feel as if Christmas came early. My son calls me The Dried Leaves Bandit.

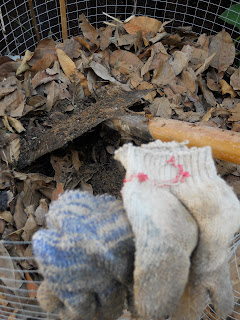
Its time to turn the compost. The last time was almost 4 months ago *shy*


Look what I found inside.. after 6 months

The plan is to transfer the other bin to this bin

Here goes.... The turning begins


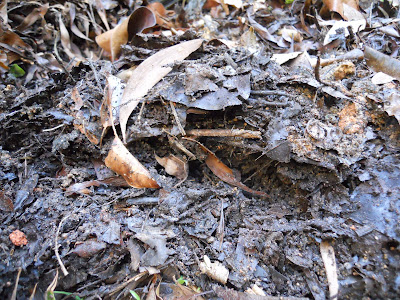
The bottom of the compost bin. Its not matured compost, yet.  How disappointing.  According to my internet research, its not good to put un-matured compost into the vegetable patch.  There might been bacteria or pathogen.  So, got to wait some more...

Posted by Picasa

Tuesday 15 March 2011

Walking Path, Cement and Pebble Blocks

When I did my house renovation, I wanted to have some unique features and came up with a walking pathway made of cement and printed with Papaya Leaves.  The effect was very nice and quite simple to do.  I requested the Indonesian worker to make the cement block and I printed the Papaya Leaves.  It was like a art and craft session :-)
 

Walking path with imprints of Papaya Leaves


Inside garden with walking path.  These were completed with pebbles.

Blocks with pebbles and Papaya Leaves imprint


Walking path cement block with Papapa Leaves, just completed


Completed Job!
Posted by Picasa

Friday 11 March 2011

Trellis Strings


I discovered that my trellis, weaved with fish nylon string was not strong enough.  So, I have redone it with fishing line string.  I hope that will last me longer.


Got this from the Aquarium shop


 This is how I tie it to keep in place for the plants to crawl up
 
Posted by Picasa

Wednesday 2 March 2011

Building Trellis

My trellis ideas was taken from the "square foot garden" concept. I bought the plastic pipes from the electrical shop and tied my own nylon strings for the plants to crawl up.


Even though its made of plastic, I hope it will be able to hold up the massive Passion Fruits which will be coming my way *fingers crossed*.


And more nylon strings but better quality, this time.


Thin wood and leftover plastic pipes to make the trellis


Nailing the wood to the plastic pipe

That's how it looks when completed

Not a real beauty, I must admit.  Once the Plants crawls up, hopefully it will overshadow it
This trellis is behind the house, at the back of the privacy fence.  Not visible to onlookers from outside.  Made it from recycle stuffs.


There were wood I picked up from the local hardware shop. He wanted to throw it and was nice enough to give it to me, instead. Then, the steel were leftover from the plaster ceiling works. 


My earliest trellis built from plastic pipe and fish nylon string. Not durable, unfortunately.


I built new trellis with a more hardy nylon string. This pumpkin (?) grew near the Compost Bin, so, I just re-directed it to climb the nylon string

The plan is for the plant to 'cut-across' to the other side and join the trellis along the fence

Oh, please bear some fruits/vegetable soon... I am dying to know, What Are You????
Posted by Picasa

Monday 28 February 2011

Privacy Fence

If you want to read of how I journeyed through with my garden, I have posted it in my other blog, Journey of My Life.  Read it here.


********************


A privacy fence was one of the idea. The reason is to block and separate the back portion of the house from the front.


The Resak Wood was purchased from the local hardware store. The sizes of wood was 2 x 4", 4 x 4" and 1 x 4"

4 x 4" pillars as foundation


4 holes of about 1 feet wide and 1.5 inch deep was dugged. Instead of digging up the hole in a day, bit by bit was dug up over a period of few days. Just as I was ready to mix the cement to put the foundational pillars, the Indonesian worker was available to assist for the next few days. Hooray! So, he helped to fix the foundational pillars.


2 x 4" was fixed on by The Teenage Son and I, when he was off from
school during the recent Public Holiday


The foundation was allowed to dry for about 2-3 days. Then, I solicited  The Teenage Son's help. Both of us took the late morning and most of the afternoon to cut the 1 x 4" plants to exactly 5 feet length with the circular saw. Then we measured and cut to appropriate lengths, the 2 x 4". That was hard work. Galvanized bolt of 3" was used to fasten the 2 x 4 " to the 4 x 4". We used the drill to make the holes.


Apparently (after everything was done), according to Hubby (who is the actual Engineer and Expert), we used the wrong drill bit size. It should have been smaller hole. Never mind, a learning process. That day, I used the drill for the 1st time in my life. Not bad.


The privacy fence and there is a plan to make a Pergola
using the same pillars


The next day, The Teenage Son had to go to school. So, I was left alone to do up the fence. All geared up and gung-ho, I proceeded to fix the fence. How hard can it be? After all, I have researched in youtube and internet.


After taking 1 hour to fix 2 planks and realised that the bolts were not aligned and the drill holes were too big... As a result, the bolts was not strong and the plank begins to fall when knocked. The Engineer and Expert stumbled upon me, the Gung-Ho-youtube-educated-Fence-Installer.


A quick lesson ensued.


Oh.. I see. That's how its done.


Eventually when The Teenage Son came back from school, all of us fixed the fence together and I must say, it turned out beautifully!


It was great fun for me... I am a Handy-Woman... by accident.

Saturday 26 February 2011

My Masterpiece

There is a small rectangle piece of land in the porch.   For months, it has been redundant and I took a looooong time, trying to figure the best way to have a simple, no maintenance and a joy to the eyes.


Cement it?


Noooooooooooooooooooo!


That is probably the last thing I want to do... but... The downside...I don't like weeding and cutting.


I also hate the 'jungle' concept.  Whereby all the plants grow well, together with weeds.


So, I took the time to think and design something which is uniquely me.  No!  The concept is not called Weird.   Its  Simple and Nice - with a touch of 'little to no maintenance' as inspiration.


The Frangipani plant was the first to go into The Masterpiece whilst I continued to think further....


Frangipani and sand


Then, I visited Sg. Buloh and they have everything you need to fit into a garden.  I bought plants, plants and more plant.   And even more plants.  Obsession??  I don't know what you are talking about.


I visited nursery after nursery for days.  I bought Philippine grass, bamboos, stones, plants, pots.... Well, somebody's gotta to help these people... Do you know how many of them are there??!!!    How do they keep up the business?  Probably with people like me who 'kills' cactus.


Obsession???  I still don't know what you are talking about.


Anyways.


I bought stones.  Many different types.


Small purple stones from Philippines


Aquarium purple stones


Orange colored stones from Thailand, I think
Shells collected from a beach in Thailand


The sandy ground was laid with black plastics which was recycled after I laid the Philippine Grass.  Its to stop the weeds from growing under the stones.  

After planting more plants and laying the stones. And now it looks like this 


Upon completion


Why are you looking so sad today?

Mama tortoise
Tortoise can be opened up and candles put inside

Baby tortoise
Little dino


There is very little I need to do for The Masterpiece other than daily watering.  Little weeding now and then but other than that, its pretty easy.  I am glad I went with stones.   But unfortunately not all stones are good to have.  I have seen the white ones and they eventually have lots of green algae growing on it.  

 
BEFORE

AFTER